1 Comment
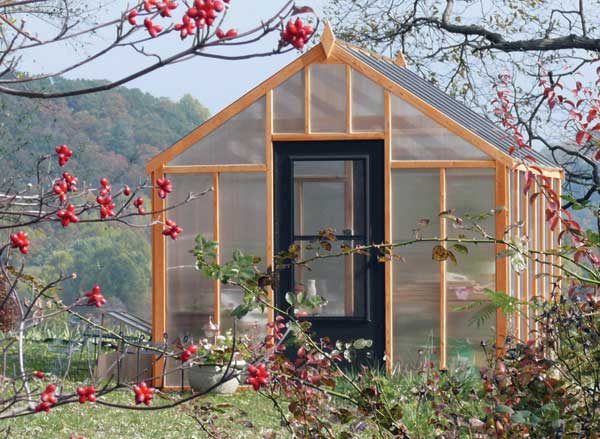
Photo Courtesy Charley's Greenhouse
To reduce costs, many people build their own greenhouses. That way, you can get exactly what you want. But what if you really don't have the time, or the ability, to build your own? From Mother Earth News, an article about all the finer points of choosing a greenhouse kit. People who love gardens also love greenhouses. The best backyard greenhouses feed the need to dirty our fingers while the rest of the garden is dormant. Even a small greenhouse can provide effective season extension by jump-starting seedlings in spring. When managed properly, a greenhouse is a backyard oasis that yields fresh food year-round. If a lack of construction skills is keeping you from building a greenhouse, consider a kit. The best greenhouse kit is one that fits your needs and your pocketbook. Kits are easier than building from scratch and don’t require as much building experience (although it certainly helps to have a DIY attitude when you set out to build your own greenhouse, even from a kit). Shopping for Your Best Greenhouse Kit Local Regulations. Start by researching required permits, zoning, setbacks, underground utilities and other requirements for your area. Some localities demand a certain type of foundation. A greenhouse attached to your home will likely face more stringent requirements than a free-standing greenhouse. In some places, greenhouses are regulated under a “storage shed” designation. Consider size carefully, as you may be able to avoid many regulations by simply settling for a small greenhouse. Site. Your greenhouse site must have adequate light — six hours of uninterrupted sun on a clear day. You may have to trim or remove a tree to create more light for your chosen location. Also, consider access to water. Is there a nearby hose bib to provide water, even in winter? Some gardeners add gutters and an interior rain barrel to their backyard greenhouses for a winter water source. Electricity can power heating, lighting and ventilation, so keep an accessible power source in mind, too. Vendors. Check companies carefully — even a small greenhouse is a big investment, and you should feel comfortable with the supplier. Don’t be afraid to ask questions, such as: • How long has the company been in business? • How many kits has it sold? • Does it manufacture the kits or simply resell them? • How extensive is the warranty? • What technical help can the company provide? • How is the greenhouse shipped and packaged? • What is the cost of shipping? You might add other questions to this list. If you have minimal building experience, read a copy of the kit’s manual beforehand to make sure it’s understandable to you. If you’ll be building the kit on weekends, ask whether someone from the company will be available to answer questions on Saturdays and Sundays. You may want to see demonstration photos or videos of the kit’s construction before committing to buy. Tech support may be limited if greenhouse kits are not the company’s specialty but just one of many products it sells. Read more: http://www.motherearthnews.com/diy/best-greenhouse-kit-zm0z13amzmar.aspx#ixzz2SFLa2VZh Having a stocked pantry is just good common sense. I like to refer to it as food insurance. You have health insurance, car insurance, home insurance, all of those things as IN CASE something should happen. Even if you live in an apartment in the middle of a huge city and never cook, having dry goods stored so that you can still eat during a crisis, whether caused by storms, terrorism or simply a loss of income, moves you from possible victim to probable survivor. From mother nature network, a gathering of pantry staples that will last indefinitely when stored correctly. To this list I would add dried beans, and you would be set if you were snowed in for a month. Just be sure you have some water stored as well, or a secondary source that is always available to you, even in a power outage. By the way, water will go stale after having been stored a long time. If that happens, just pour the water back and forth several times between two containers...that will put oxygen back into the water. :) "Could those foods you're getting ready to toss, still be good? Janice Revell, co-founder of StillTasty.com, says "Look in your pantry and your cabinets and check whether the items really do need to go. You'll be shocked by what you really don't need to throw away." So before you throw out that years-old sugar or replace that bottle of vanilla that's been gathering dust, consult our list of "forever foods." You may be surprised how many of your kitchen staples have a shelf life of decades — even after they've been opened." See the list here...http://www.mnn.com/food/healthy-eating/photos/forever-foods-10-cooking-staples-that-can-outlast-you/sugar 
After almost three years of living this homesteading lifestyle, I have learned a valuable lesson; start small, and dream big.
I have a very bad habit of aquiring animals that I think suit our purposes, before I have their buildings/stalls/fencing/enclosures finished. I am now in the position of having to sell half of our stock, because I do not have the pastures available to them to forage. That means that every bit of what they eat has to be purchased, which just isn't practical. In addition, there does not seem to be much of a market in our area for sheep, which makes it nearly impossible to recoup any money spent feeding them through the year. The main lessons? Know your market, know your own strengths and weaknesses, and concentrate your efforts on one or two species. I am grateful for this experience, and know now that I am simply not the kind of person who can keep a menagerie and still break even, let alone make a profit. I know some who do, and I applaud them. But for us, scaling back and rethinking our business plan is our plan of action. And I will no longer bring any animal to the farm without having the space available for them. Learning this lifestyle is certainly an ongoing project. But it is absolutely one that is full of lessons worth learning. I have terrible anxiety issues, so finding ways to deal with it naturally is important to me. There may not always be a pharmacy around, and even if there is, using plants is better for your body. Many of these are very easy to grow no matter where you live. Most will also work if you have trouble sleeping, and who wouldn't love a cup of lavender/lemon balm tea? 
Thanks to Rebecca Nickols for featuring our coop in Community Chickens!
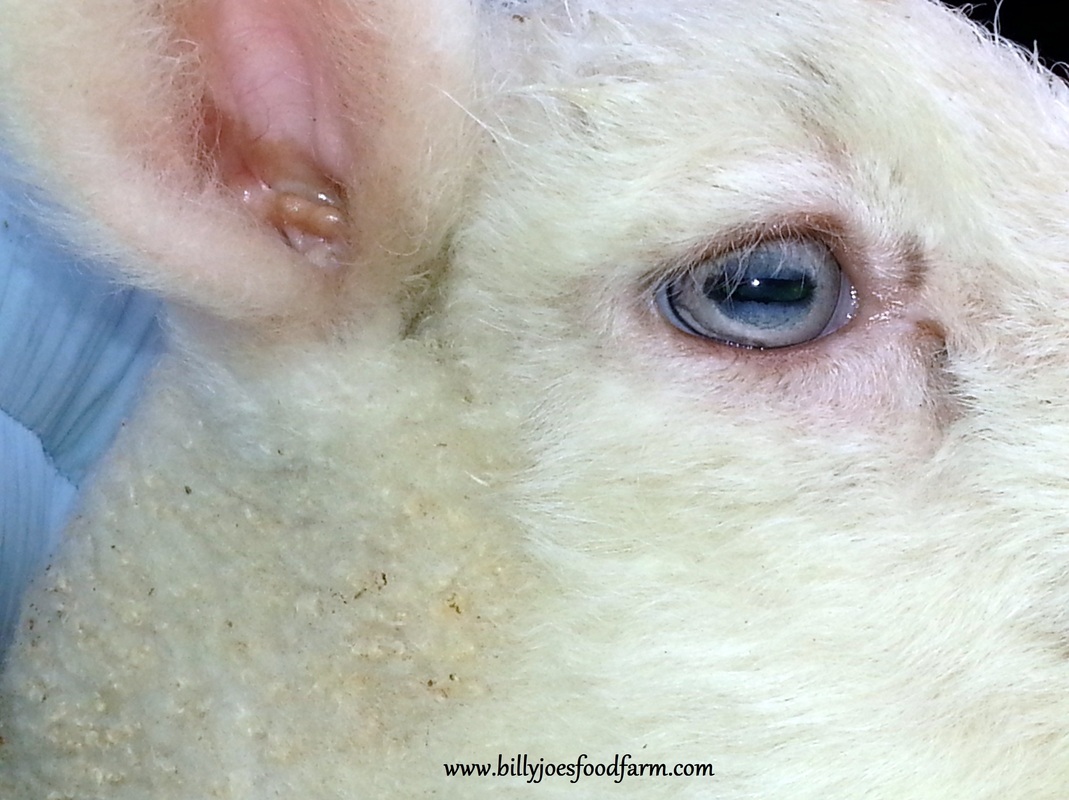
http://communitychickens.blogspot.com/2013/04/cool-coops-solar-power-chicken-coop.html This little ram is only a week old, so his eyes may not stay blue. But of the three that were born this month, he is the only one to have blue eyes. Strange, and beautiful. If they stay blue I may just keep him here. 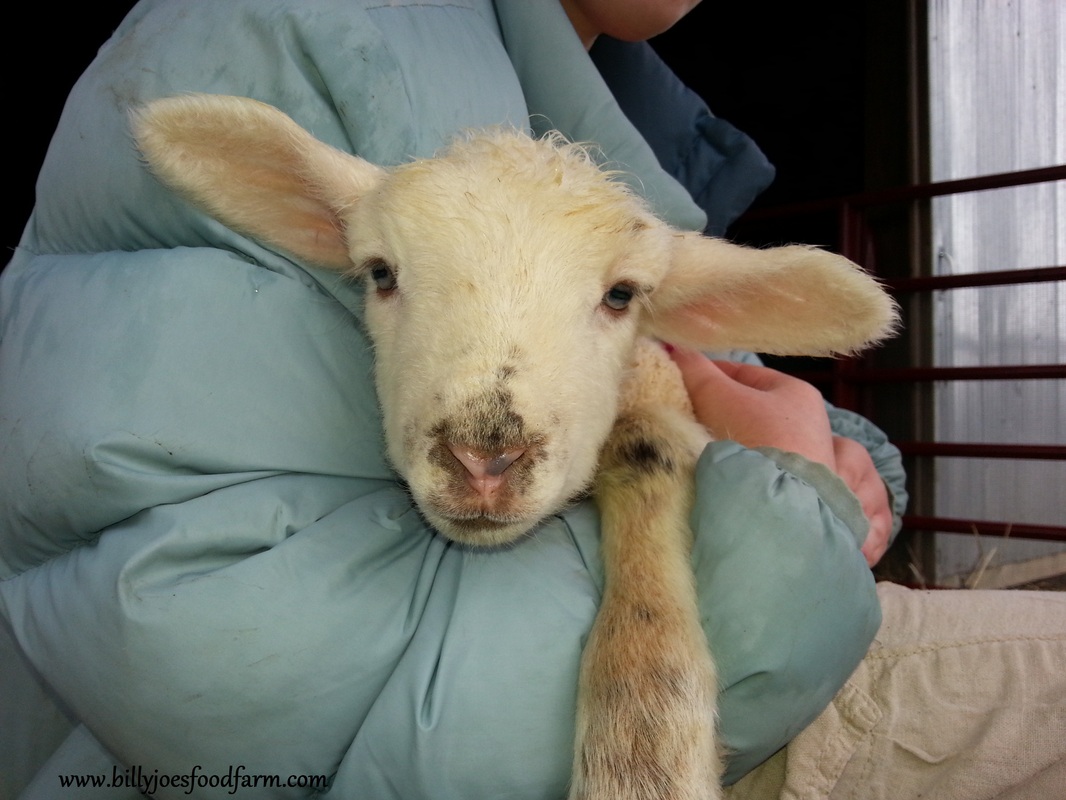
We have at least a few determined readers who live in town, or have no yards, or live in apartments, have health issues and can't manage gardens, etc. I am going to repost today some ideas for gardening in small spaces. It takes just as much work to plant and grow ornamentals as it does food; both are pretty, but for the work involved, why not get some produce out of the deal? Below are several ideas that I have found while traipsing around the internet, some I have posted before and some I haven't. They are all great for inspiration. Happy Growing! 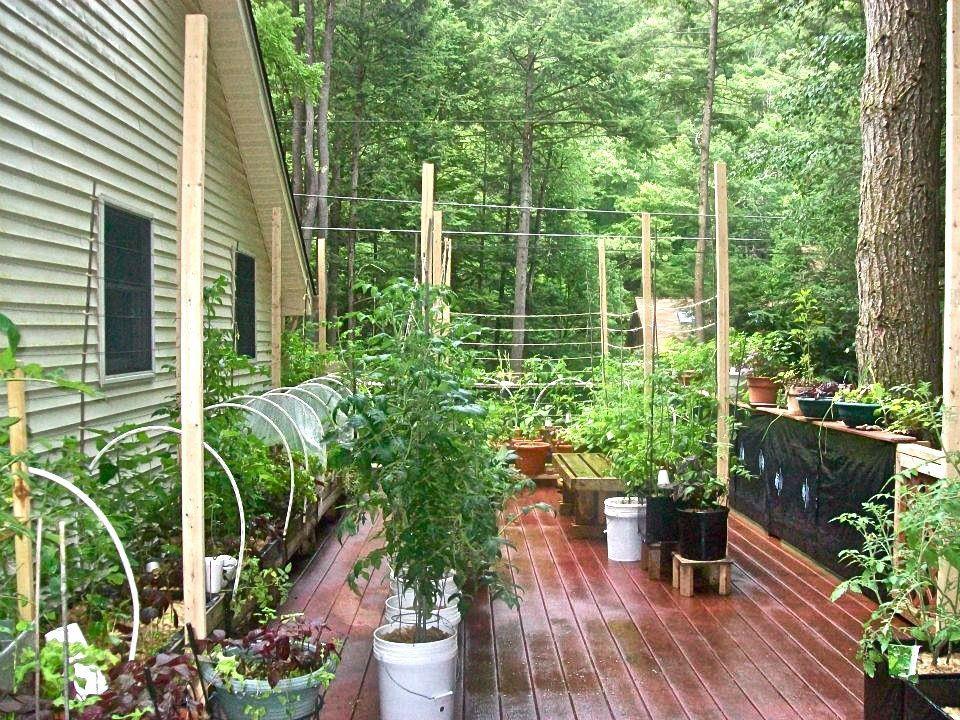
Container Gardening on Your Deck, Patio, or Balcony
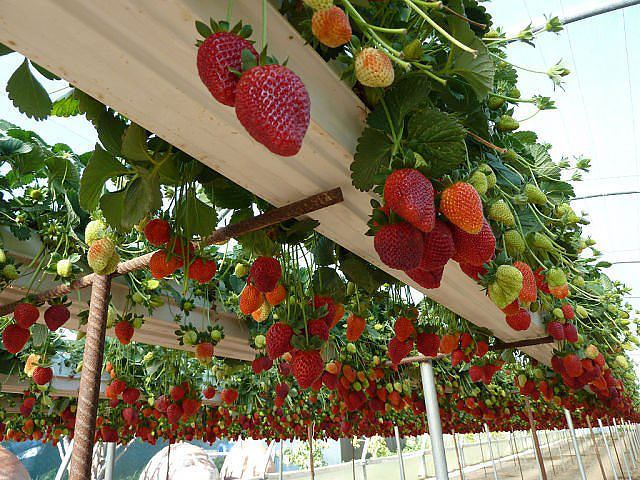
Grow Strawberries, Or Any Other Similarly Sized Plant, In Recycled Guttering
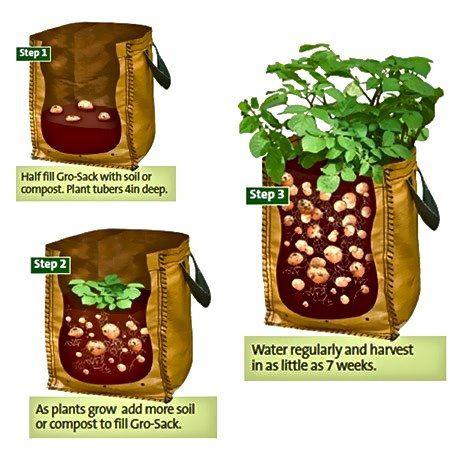
Above is an illustration on how to grow potatoes in a bag; you start at the bottom, and fill with dirt as the plant grows. However, I want to add a little information to this drawing; it looks like it has the seed potatoes planted whole. DO NOT plant whole seed potatoes. You need to cut them in cubes first, with one or two eyes per cube, then let them dry (cure) for two or three days. If you don't, most of them will rot before you get any food from them. Then plant them eye up, and back fill dirt as the stalk grows. 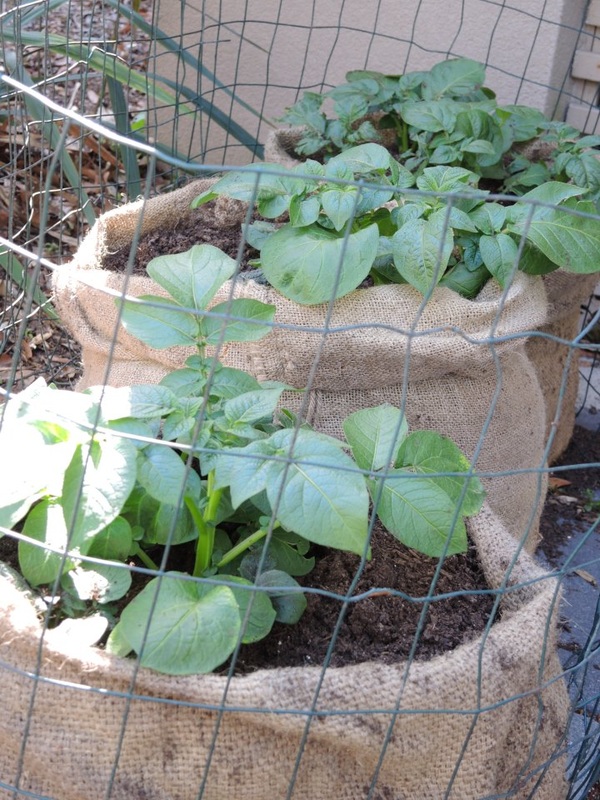
Grow food in a bag.
Grow food on your kitchen counter.
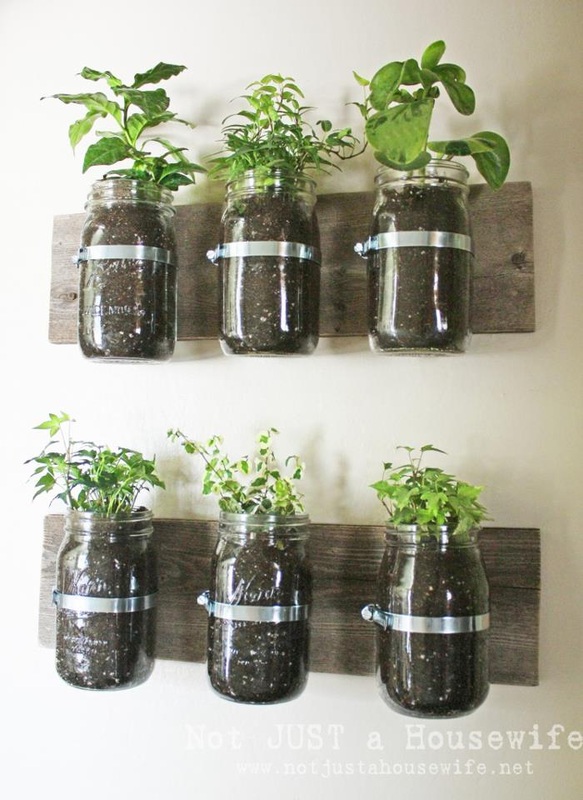
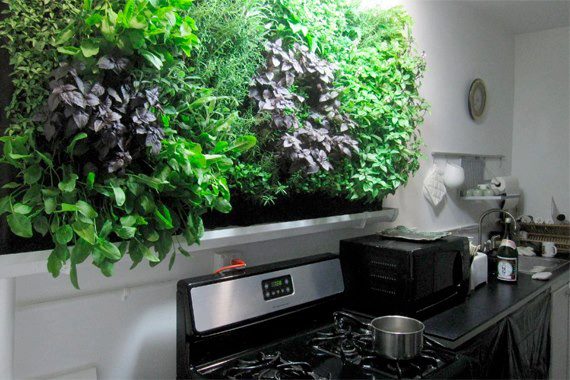
Grow food on your walls.
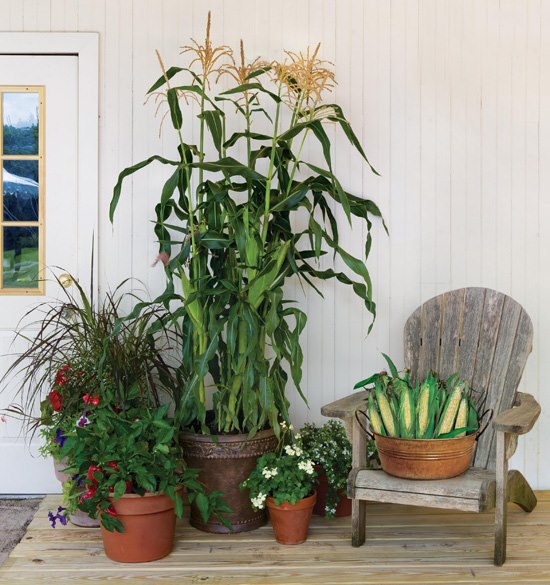
Grow food in pots.
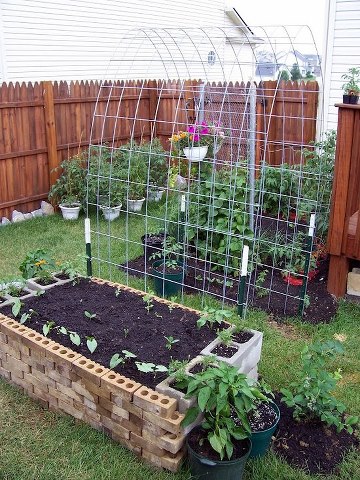
Be creative and save some money; grow food in small backyards.
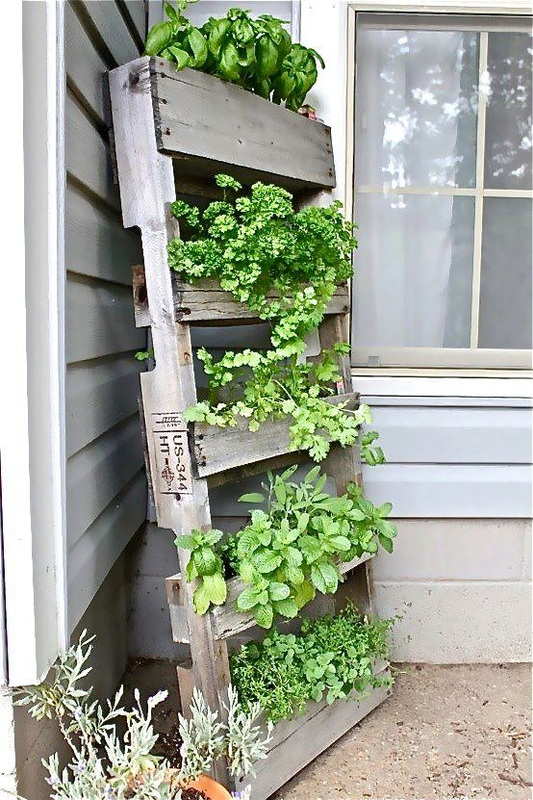
Grow food in pallets.
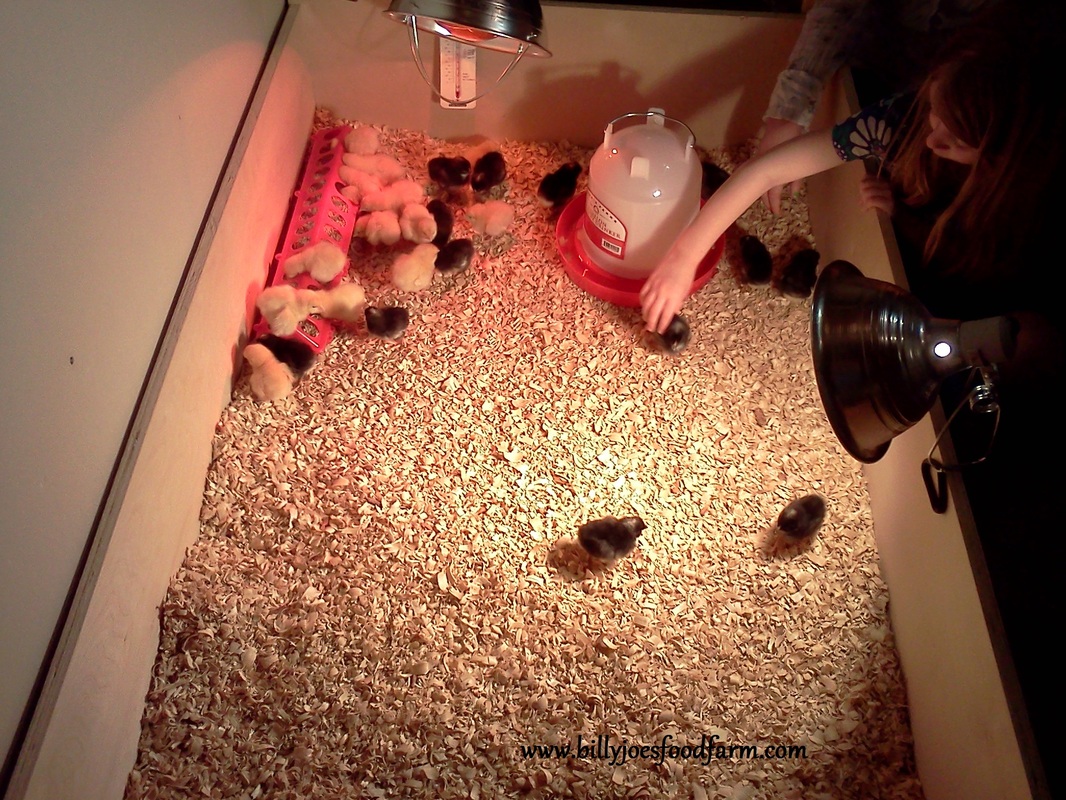
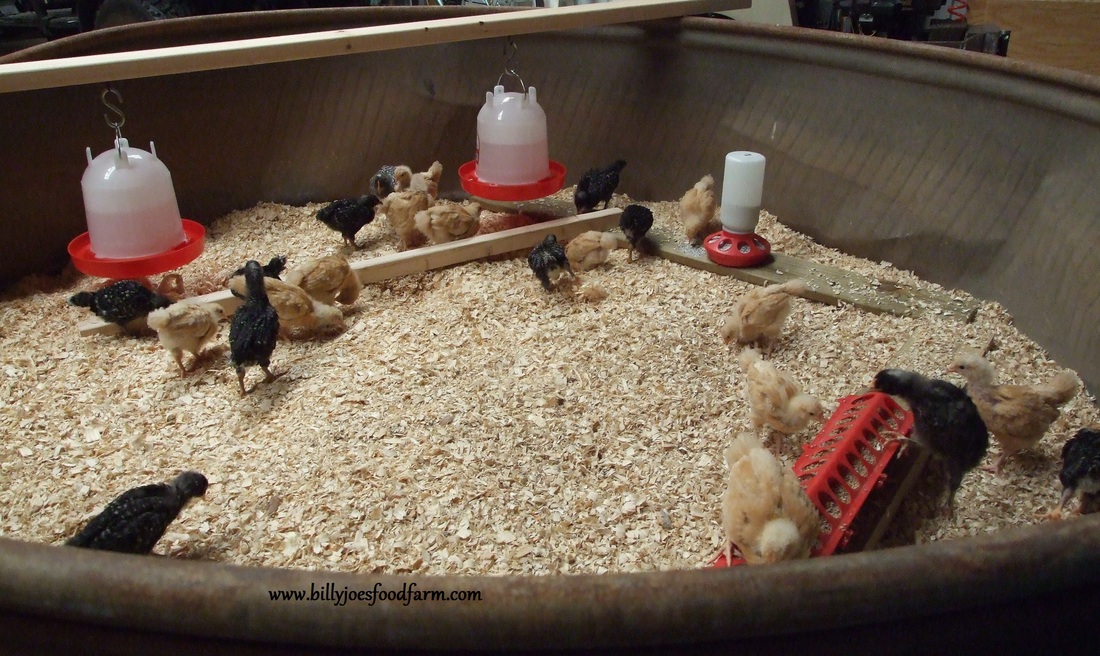
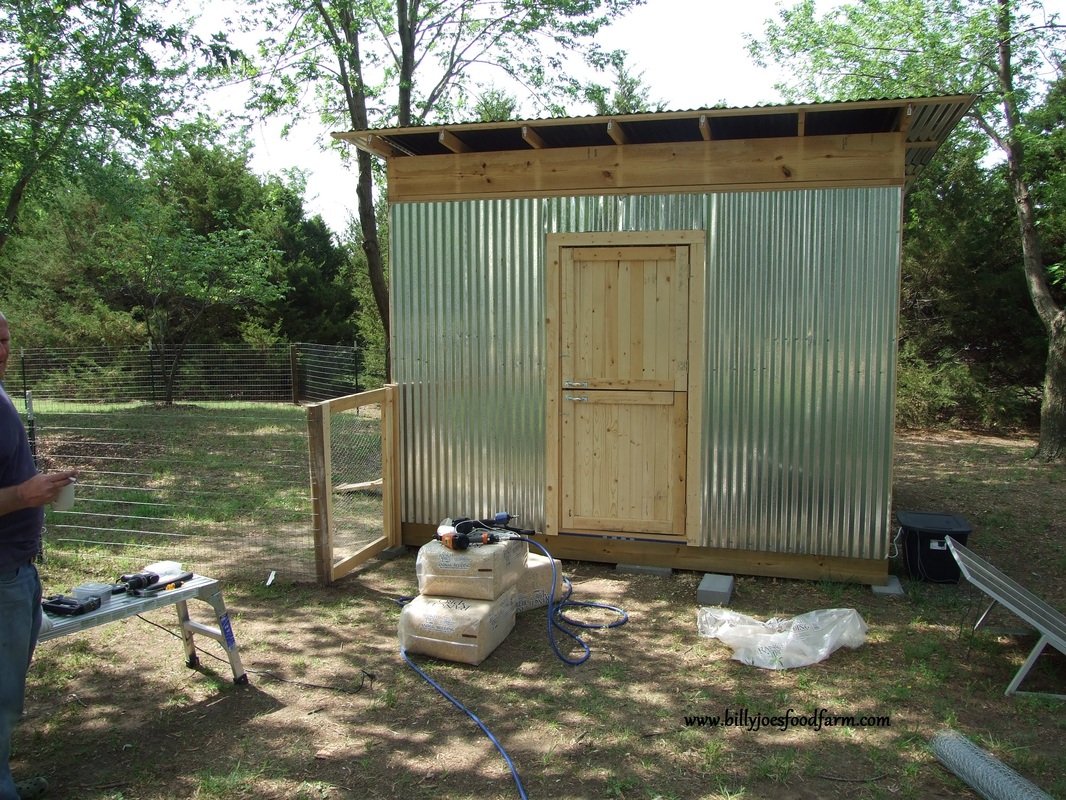
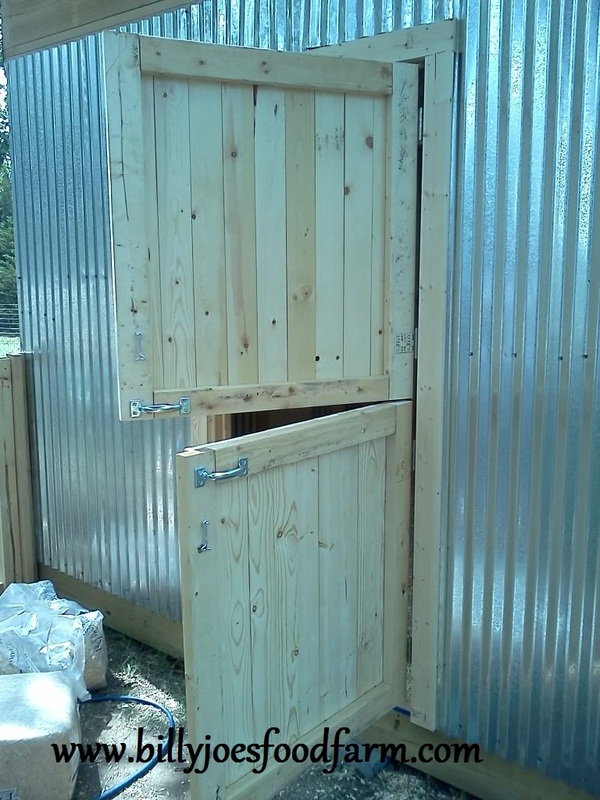
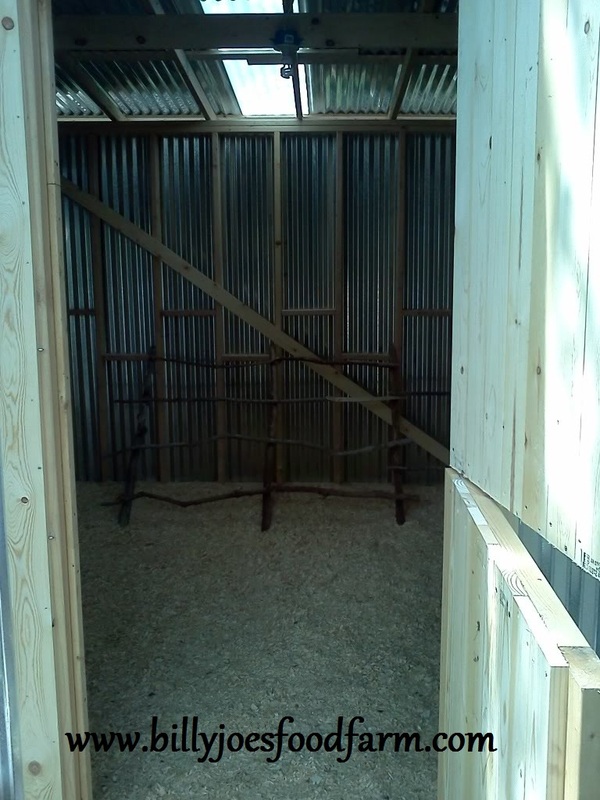
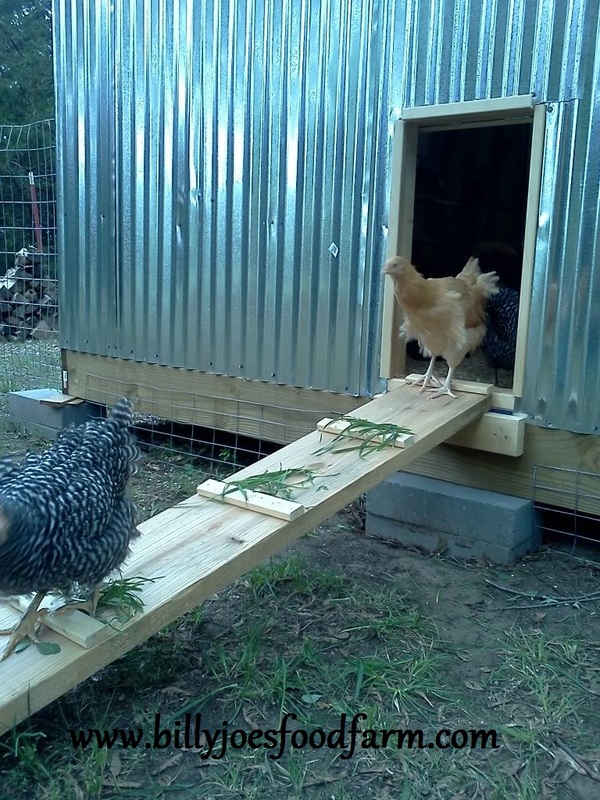
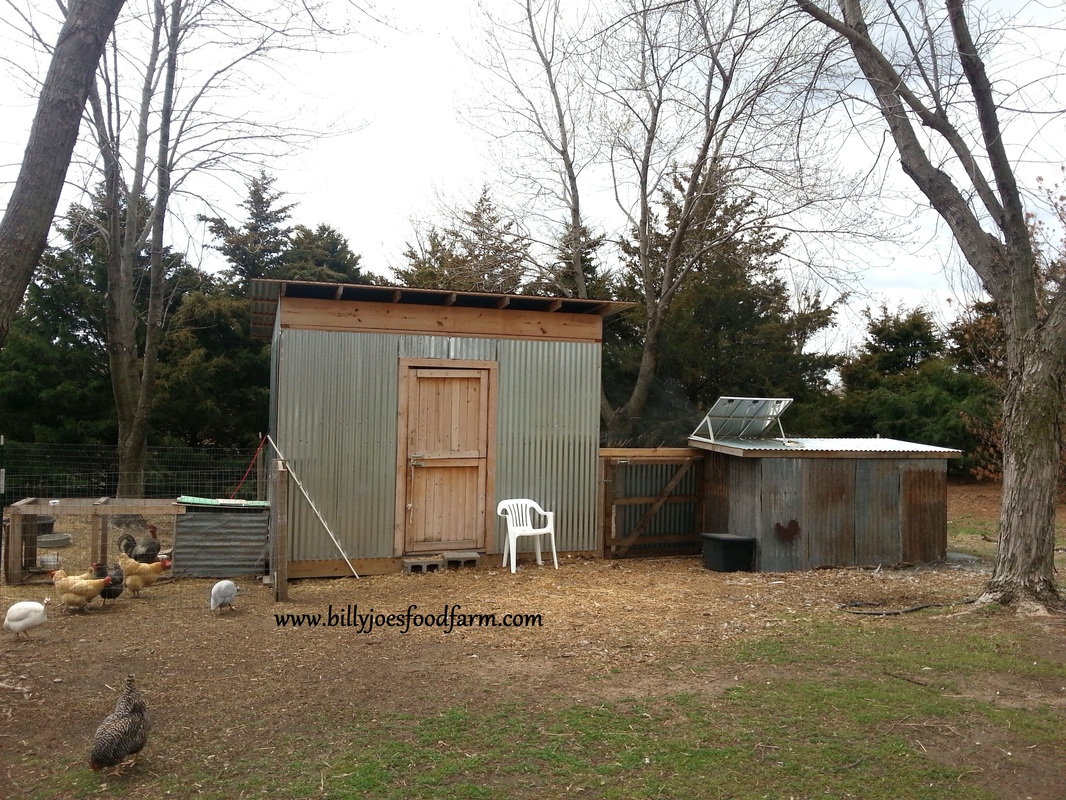
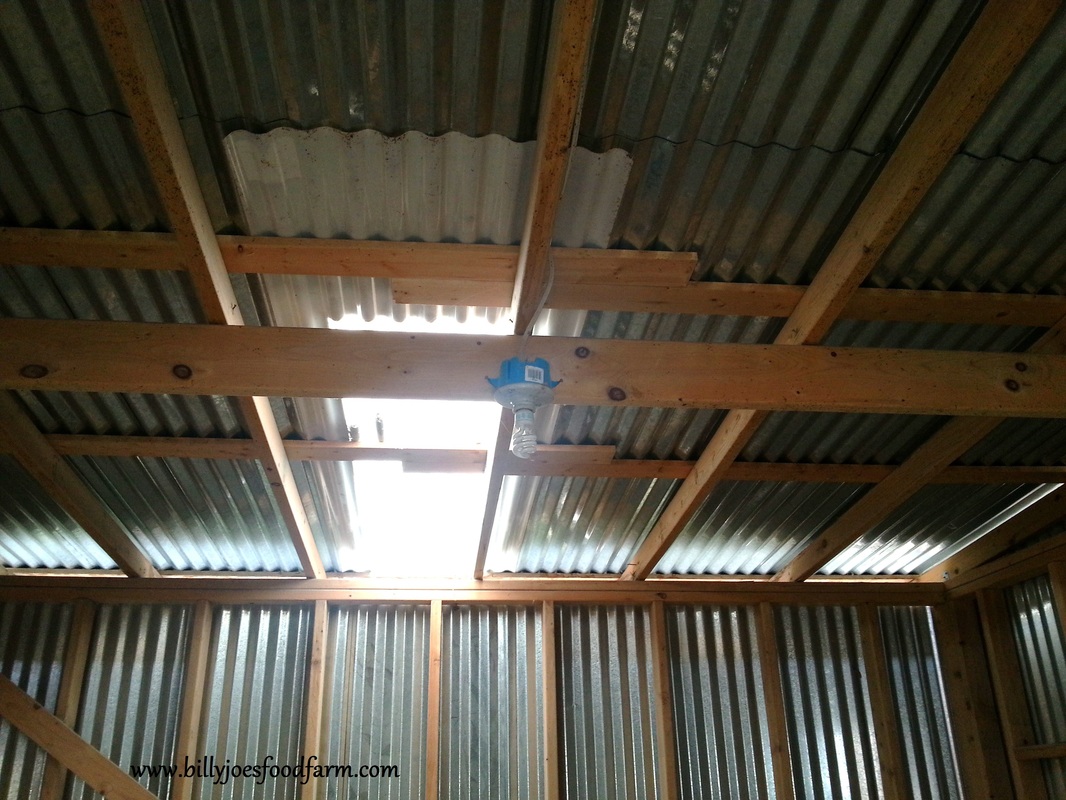
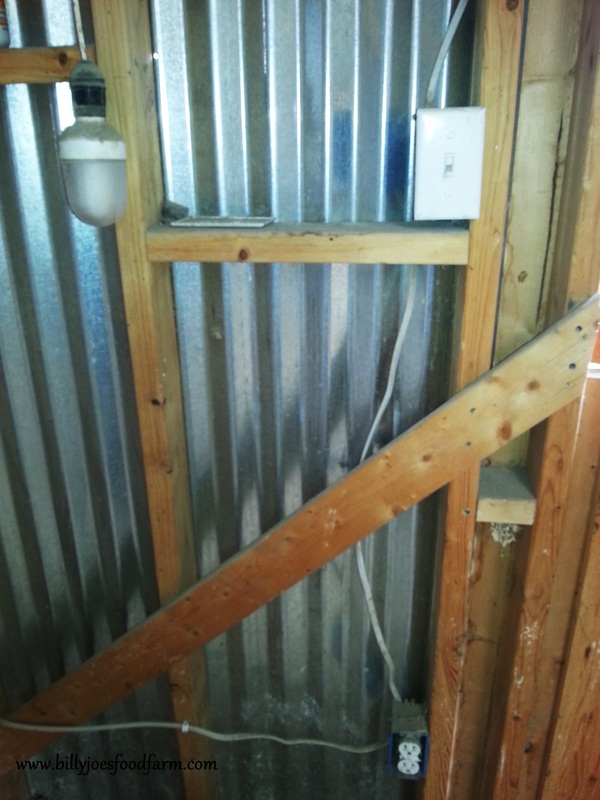
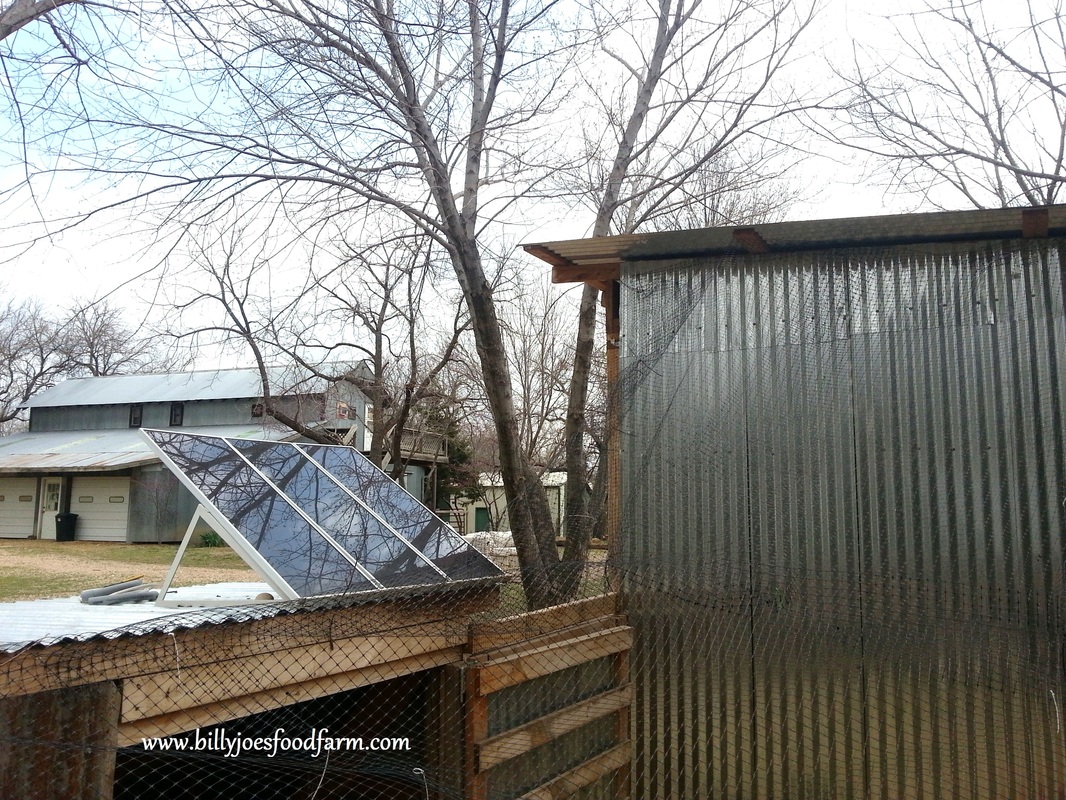
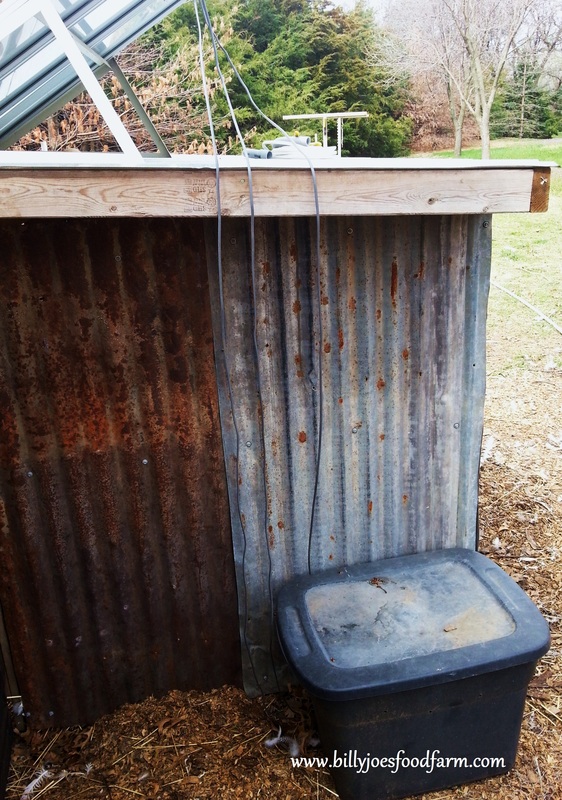
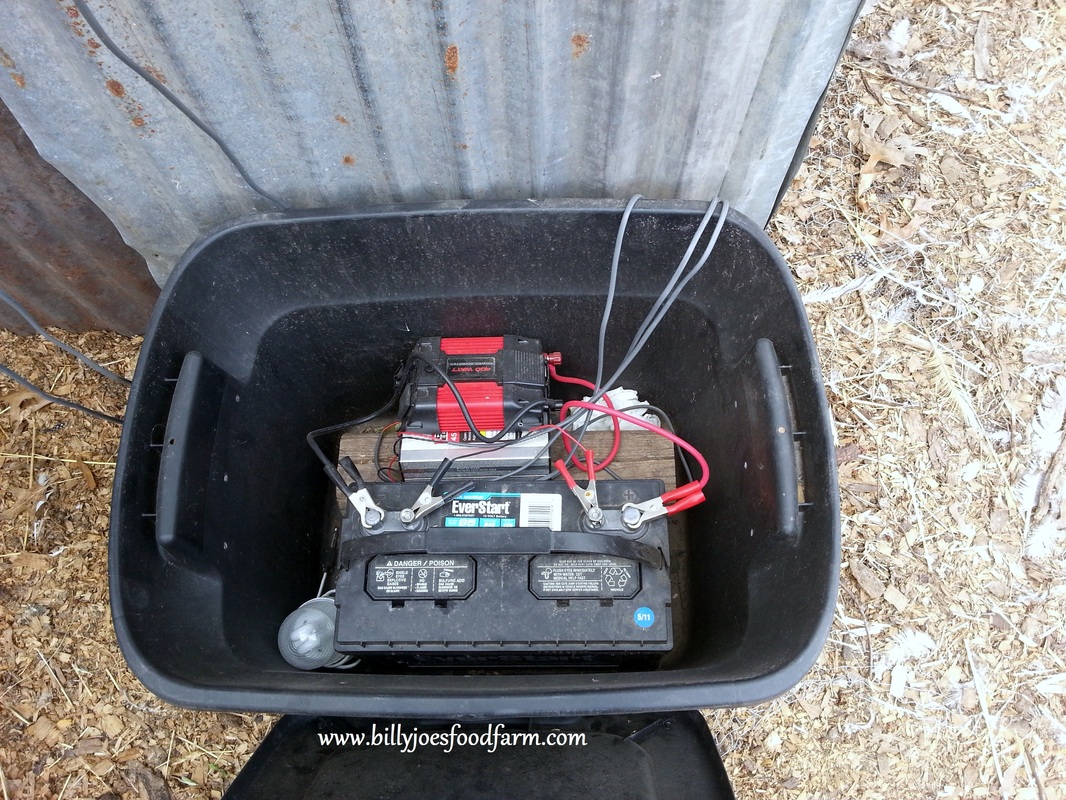
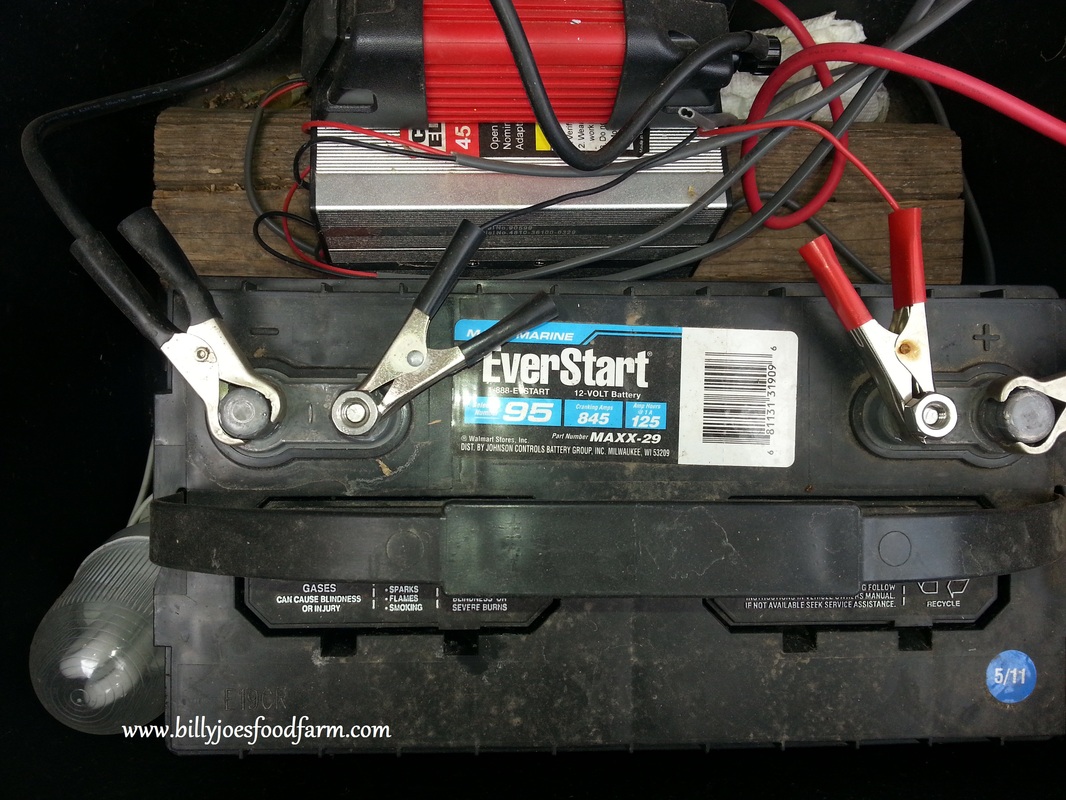
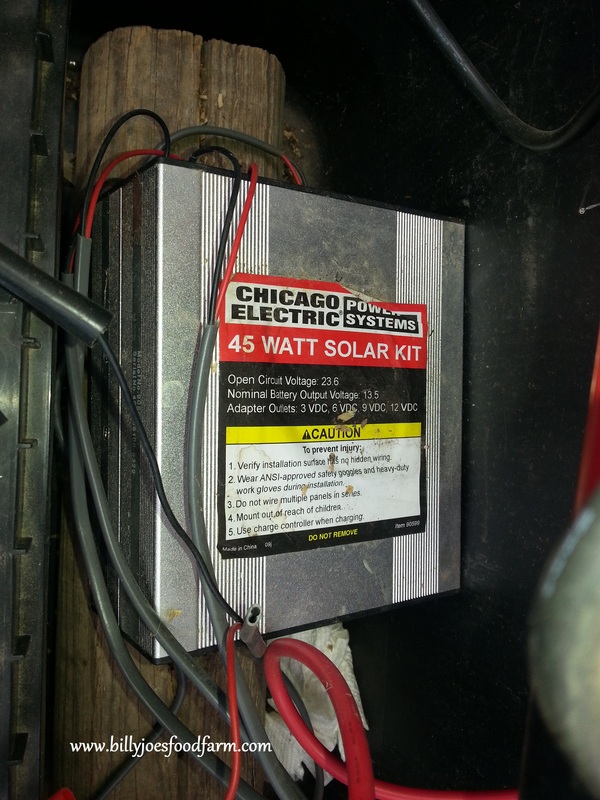
*This article was originally posted on December 27, 2012, and has been reworked with more photos and additional information.* We moved to this property in November of 2010, and it had never been used as a farm with animals. The back land had been farmed for hay, and twenty five years ago (before the house was built), there were horses kept on the property, but when we bought the place it was not set up for homesteaders. Our new place does have a barn that had been used in the past for the horses, but it was wide open on the inside, with no stalls or gates. The people we bought the place from had used the barn for storage, and had stripped it bare of any livestock keeping capabilites. We had our work cut out for us to try and build, bit by bit, into self sufficiency. I figure that might take the rest of our lives. The first animals I purchased were day old chicks; 14 Buff Orpingtons and 13 Barred Plymouth Rocks. When they arrived of course I had no coop, and it was freezing outside anyway. We set up an area in the basement with a heat lamp, some wood chips, and some hastily screwed together pieces of wood to make a rectangle shaped enclosure. We then got to work figuring out what we wanted for the coop. I still to this day have a terrible habit of buying the animals that are part of my plan BEFORE I have their enlcosure or fencing done, but I suppose that is another post for another day. While we were trying to get the coop finished, the birds grew to the point that we could no longer keep them in the house. We moved them out to the shop, into a big round bale holder that was out in one of the pastures that was here when moved in. It worked well for the teenaged birds through January and February, and we kept a couple of heat lamps there for them to keep them warm as they finished feathering out. Toward the end of their stay in the shop, the birds had all their feathers and could fly out of the trough. As a result, the shop was COVERED in poo; we couldn't get the coop done fast enough. We built our chicken coop off of the ground so digging predators couldn't tunnel into the building, and the walls are metal so snakes can't slither up into it. The hatch has a lock on the inside, so the raccoons and possums can't raid the joint at night. Mr. Food Farm used two pieces of clear corrugated fiberglass in the roof to let light in, and made Dutch doors so that we could check on the birds without letting them out if we needed to do so, or to leave the top half open for ventilation without leaving the entire coop open to would-be egg eaters. The floor is solid plywood, with some leftover linoleum from our old house on top of the plywood, so that the plywood wouldn't get wet and rot. The back ladder style roost is made of a big crepe myrtle that had died and left behind it's perfectly round, smooth branches and trunks. I have a couple more single rung roosts in two of the corners, as well as a row of six nesting boxes. Being interested in self sufficiency lends itself to wanting to be off grid, and we thought a small project to begin with would be a good way to learn. We decided to install a solar system on our chicken coop, to run a light during the days when sunlight is in short supply. A hen will lay eggs based on the number of hours of sunlight during the day, which is why they traditionally lay more in summer and less in winter. If you keep a light in the coop, it tricks them into laying almost all year round. Our system was purchased at Harbor Freight two years ago, and has been running the light in our coop ever since with no problems. It is a three panel system, each panel putting out 15 watts for a total of 45 watts. You can add more panels to this, but we have not done so yet. We have used the power generated by these panels to run the light, a fan during very hot nights, and an electric drill when we were building next door to the coop. We don't use our system to run a heater for the building or for water; we bought winter hardy chickens so that we wouldn't need a heater, and we also keep ducks in our coop, so no water is allowed in the building or the ducks would have the place flooded. Inside the coop is the light on the ceiling, the switch next to the door that is hard wired to the light, and an outlet that is hard wired as well. The light fixture is a standard fixture that you can get at any hardware store, as is the electrical wiring, the outlet and the switch. The only thing that is different about a solar system is that the wiring goes to a plug, rather than a fuse box. The plug is inserted into a 400 watt power inverter, which we purchased seperately. The inverter is hooked to the battery, to the positive and negative posts. The voltage regulator is wired to the battery and to the solar panels. Our three panels are on top of our broody house, which is built next to the coop (although it currently has a mama Nigerian Dwarf goat and her twins, and no birds). From the panels, wires run down into a black plastic bin, which holds the battery, the inverter and the regulator. Wiring from the regulator then runs out of the plastic bin to the solar panels. The panels soak up the sun, the current runs down the wires into the regulator, which is then stored in the battery where it waits until we flip the lightswitch. When we do, the power in the battery runs into the inverter, which changes the power from DC to AC, then the AC power is run from the inverter into the wiring for the coop via the plug. I really don't know much of anything about electricity, or solar power, although I know more now since we installed this unit. I thought that this small system would be a great introduction for us to get into solar power, and I am really impressed. We plan to buy more panels in the future, and slowly move over to solar power. Know that we have dipped our toes into free energy, we are thinking about adding a wind turbine, too. Being free of an electricty bill is certainly a goal worth working toward, and this system can get you on your way. Read the reviews of the Harbor Freight solar panel kit here, loads of helpful information from others who have set up this kit for all sorts of uses. I know there are more knowledgable people there who have left comments that might answer any questions you have about how this kit works, although I will try to do so as well. | If you like our blog and would like to help support what we do, please feel free to donate any amount to help keep us going! Our goal is to use this blog to help care for the animals. We will let you know how your donations are used. Thank you!
 The Enclyclopedia of Country Living is one of THE best homesteading books I have ever purchased, and I still refer to it often.
AuthorWe are city folk who decided to move our family to the country, to experience life the way it ought to be lived...OUTSIDE! CategoriesAll ArchivesFebruary 2014 
|


 RSS Feed